Timeline Editor Window
The Timeline Editor Window is where you will Create and Load Sequences, control Edit time Playback, use Plugins, and select and manipulate the Frames in your Sequence.
Timeline Editor Window Layout
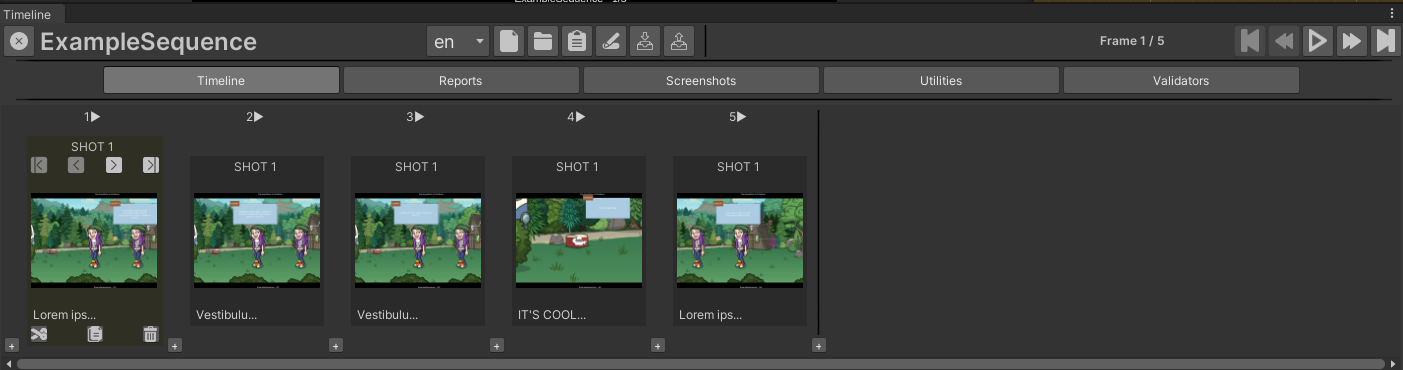
Above you can see the different parts of the Timeline Editor Window. Below is a brief description of each:
-
Close Button: Closes the Tool Suite and returns Unity to the Layout you had active before you entered the Tool Suite.
-
Sequence Name: The name of the current Sequence.
-
Locale: A dropdown to select the Translation data that should be displayed in the Tool Suite and Playback of the Sequence.
-
New: Creates a new Sequence and Loads it for Editing.
-
Load: Loads an existing Sequence for Editing.
-
Copy: Creates a copy of the current Sequence at the selected location.
-
Rename: Rename this Sequence.
Note
Using the Rename Tools here or in the Story Sequence Script Inspector are the recommended ways to Rename a Sequence. If you don’t use these tools Translation data will not be automatically renamed and Dialog for your Sequence will likely fail to load.
-
Import CSV: Select a CSV file to Import as a new Sequence.
-
Export CSV: Exports the current Sequence in CSV format with the Dialog and Text written out using the current Locale’s Translation.
-
Frame Counter: The current Frame out of the total number of Frames.
-
Playback Controls: Controls the Playback.
- Jump to Beginning
- Move Back One Frame
- Play: Plays the current Frame but does not advance.
- Move Ahead One Frame
- Jump to End
-
Plugins Tab: Toggle between Plugins drawn in the bottom of the Window.
-
Timeline Tab Display: The Timeline Tab Display is where you will spend most of your time with the Timeline Editor Window. It allows you to add, remove, and change the order of Frames. For more on the specifics of the Timeline Tab Display Controls, see below.
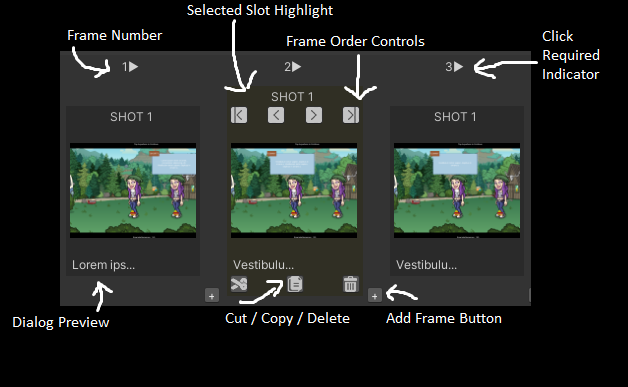
Timeline Tab Display
Frames are displayed in the Timeline in two modes; Selected (yellow) and Unselected (grey). The Selected Frame will have its contents drawn in the Frame Editor Window for modification and additional controls are present in the Timeline for changing the order of the Frame in the Sequence.
Frames are easily selected by clicking on them or Playing through the Sequence using the Playback Controls in the Timeline Editor Window.
-
Frame Number: The number of the Frame in the Sequence.
-
Click Required Indicator: Some Frames require a Click from the User to advance to the next frame. At Edit time, all Frames require a Click to advance (so you can actually edit them), so Frames that require a click at Runtime are marked with a ‘►’.
-
Shot Divider: Shot Dividers are thin vertical black bars that indicate when subsequent Frames change Sets.
Note
For Example, in the image above, Frames 2 and 3 have the same Set. Frame 4 has a different Set. Therefore a Shot Divider appears between them.
-
Add Frame Button: Clicking the Add Frame Button opens a popup that lets you specify how many new Frames to add and what type. The options for type are:
-
Duplicate Previous (if possible)
-
New
-
Paste from Clipboard (if applicable)
-
Duplicate Next (if possible)
-
On a Selected Frame there are a few additional controls:
-
Frame Order Controls: The Frame Order Control Buttons move a Frame around in the Sequence
-
Jump to Beginning
-
Move Back
-
Move Forward
-
Jump to End
-
Cut
-
Copy
-
Delete