Sets
Sets are the physical locations where Cameras and Actors are placed during a Sequence.
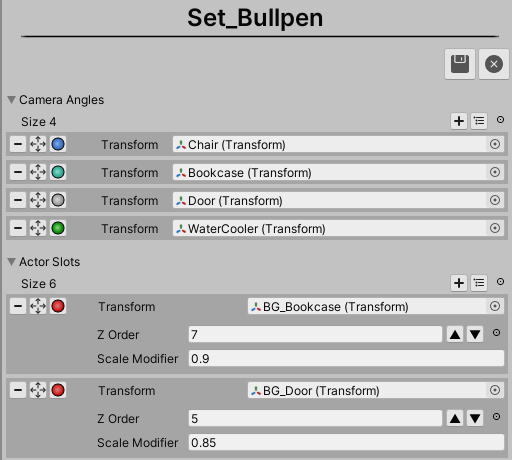
Sets store three types of Data; Camera Angles, Actor Slots, and Bounds.
Camera Angles
Camera Angles are simple Transform references that are used to place and rotate the Story Sequence Camera during Playback.
Camera Angles also store an int which determines what color of Icon they use in the Scene View during Edit Time.
Actor Slots
Actor Slots are also simple Transform references but they can be used to place and rotate Actors or Cameras during Playback.
Actor Slots also store an int which determines what color of Icon they use in the Scene View during Edit Time.
In the case of StorySequence2DSets, Actor Slots have some additional data; Z Order and Scale Modifier.
-
Z Order: Z Order is passed to any Actor placed in this Slot so it can be used to Order 2D renderers correctly.
-
Scale Modifier: Scale Modifier is used to help fake perspective. Actors placed in this Slot will be scaled a Vector3 of this float value in all three channels.
Bounds
Set Bounds are calculated automatically based on the Bounds of every Child Renderer of the Set Object. These Bounds are used to place multiple Sets as they are Instantiated so that they don’t overlap one another and we save the overhead at Play Time of setting many GameObjects or Renderers as Active or not at each new Frame.
Creating a Set To create a Set, follow these steps:
Create an Empty GameObject in your Scene.
Add a Story Sequence Set Component to that GameObject (StorySequenceSet2D or StorySequenceSet3D or a new class you’ve created for your Project).
Add Art Assets as Child GameObjects
You can organize and nest these anyway you like.
Use the Story Sequence Set Class’ Inspector to Add Camera Angles and Actor Slots
Position these Slots in the Set as desired.
Define any additional Data needed for each Slot.
Save your Set as a Prefab when you are finished editing.
Creating a Set
To create a Set, follow these steps:
-
Create an Empty GameObject in your Scene.
-
Add a Story Sequence Set Component to that GameObject (StorySequenceSet2D or StorySequenceSet3D or a new class you’ve created for your Project).
-
Add Art Assets as Child GameObjects. You can organize and nest these anyway you like.
-
Use the Story Sequence Set Class’ Inspector to Add Camera Angles and Actor Slots
a. Position these Slots in the Set as desired.
b. Define any additional Data needed for each Slot.
-
Save your Set as a Prefab when you are finished editing.
The Story Sequence Set Base Inspector and Set Editor view of the Frame Editor implement some custom interface on the Camera Angles and Actor Slots Arrays to make them easier to work with.
Each Array offers three buttons at the top of the Array to Add a new Element. These can be found below the Array Foldout, above the Elements, across from the Size Label.
-
Add a New Element: Clicking the Add a New Element Button will open a popup that asks you to provide a name for a newly created Transform. Once you supply that and confirm the new Transform will be added as a Child GameObject parented to the Set GameObject. It will be assigned as the Transform value in the new Element.
-
Add Children of Selected Parent: Clicking the Add Children of Selected Parent will open the Object Picker and require you to select an existing GameObject. After doing so all Child GameObjects of that Parent will be added as new Elements.
-
Add Existing GameObject: Clicking the Add Existing GameObject button will open the Object Picker and require you to select an existing GameObject. After doing so, that GameObject will be added as a new Element.
Each Element in the Array also has three Buttons you can use to refine the Slots in your Set.
-
Delete: Deletes this Element from the Array.
-
Move: Selects the Transform of this Element. This allows you to modify Slots positions in the Scene quickly without having the Hierarchy and Inspector windows present.
-
Change Icon Color: Clicking this Button will cycle through the Icon colors built into Unity for GameObject Nameplate or Dot Icons. The visibility of these Icons can be toggled from the View Display Controls Window. Color coding your Slot’s Icons is not required and exists to help you identify Slots in a way that is meaningful for your Project.
If you are working with a Story Sequence Set 3D Slots will have a fourth button:
- Rotate: Select this Transform and switch to the Rotate Tool.
Edit an Existing Set
There are a few ways to begin Editing an existing Set…
-
While Editing a Sequence, in the Frame Editor, next to the Set Property Field Click the ‘Edit Set’ Button.
-
A New Scene will be created with just your selected Set, ready for editing.
-
Make any changes. Click the Save Button to Apply Changes to the Prefab.
-
Click the Close Button in the Frame Editor Window to return to Editing your Sequence.
-
Drag the Set Prefab into the Hierarchy or Scene View.
-
Make your changes.
-
Apply Overrides to save your work.
-
Select the Set in the Project View and Click ‘Open Prefab’ in the Inspector.