Frame Editor Window
The Frame Editor Window is a contextual Editor that functions much like an Inspector for the Tool Suite. It can be found on the far right side of the Layout
Its primary role is to provide access to the data inside of a Selected Frame. Here you can modify the Set, Camera, Blocking and Dialog data for the Frame you have selected in the Timeline.
Within the Tool Suite it is possible to make quick edits to Sets, and when doing so the Frame Editor will display controls for Set Editing.
Frame Editing
The Frame Editor has a number of fields organized vertically. Starting from the top you will find:
Pause
At the top of the Frame Editor you will find the Pause Settings. Here, if applicable, you’ll find the toggle to Ensure Pausing on your Frame.
The Pause Status of the Current Frame will be displayed. If your Frame will Pause; either because it has Dialog content, or because it doesn’t have Actor Movement or Camera Animation, a text label will tell you why. If your Frame doesn’t have Dialog, and does have Actor Movement or Camera Animation the Frame will automatically advance to the next Frame when its Movement or Animations are complete.
Sometimes, you may want to Enforce a Pause when the Frame would normally automatically advance. When a Frame would automatically advance a Toggle will appear with the option to Ensure Pause.
Set
Next up is the Set. This is typically the first piece of data you will need to set for your Frame as it determines many of the other options you will subsequently choose.
If you’ve already chosen some Sets in other Frames in your Sequence, you’ll be able to quickly select one of those Sets from the Dropdown field. If you haven’t chosen any Sets for your Sequence yet. this Dropdown will be empty.
If you need to choose a Set other than what is available in the Dropdown, click the Object Picker button to the right of the Dropdown. This will open the Object Picker Window and you can choose a Set from within your Project.
Once you have a Set selected, the Edit Set Button to the right of the Object Picker Button will become active. You can click this Button to enter Set Editing Mode.
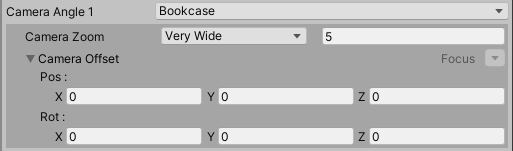
Camera
The first two properties you will need to set for the Camera every Frame are Camera Angle and Camera Zoom.
-
Camera Angle: Selected via a Dropdown that only includes Camera Angles and Actor Slots in your selected Set.
-
Camera Zoom: Camera Zoom is a float. Choose a value that fits your content and desired composition.
There are two additional sections of Camera properties that can optionally be set; Camera Offset, and Camera Animation.
Camera Offset
-
Pos: A Vector3 that will allow you to fine tune the position of your Camera relative to its assigned Camera Angle.
-
Rot: A Vector3 that will allow you to fine tune the rotation of your Camera relative to its assigned Camera Angle. Note: The Rotation field may be hidden based on your Editor Config.
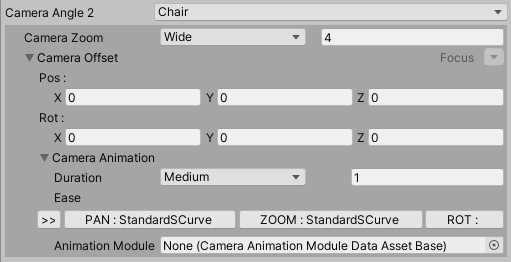
Camera Animation
The Camera Animation Foldout offers the opportunity to set a second Camera Angle (named Target Angle). If you do, during this Frame the Camera will tween from the main Camera Angle to this second Target Angle based on the details you provide in the Camera Animation section.
-
Target Angle: Selected via a Dropdown that only includes Camera Angles and Actor Slots in your selected Set. This is the Camera Angle the Camera will animate TO.
-
Zoom: The target Zoom value the Camera will animate TO.
-
Pos: A Vector3 that will allow you to fine tune the position of your Camera relative to its assigned Camera Angle.
-
Rot: A Vector3 that will allow you to fine tune the rotation of your Camera relative to its assigned Camera Angle. Note: The Rotation field may be hidden based on your Editor Config.
-
Easing Curves: Curves for controlling the Easing of this Camera Animation. Note these may be drawn as a single Object Field, or with only Pan and Zoom options if Camera Rotation is disabled in the Editor Config.
-
Duration: How long this Camera Animation will take to complete in seconds.
-
Animation Module: The selected Camera Animation Module and any of its properties.
Blocking
Blocking is an Array that is present within each Frame in a Sequence. The Blocking array details how many and which Actors are present, where they are, and what they are doing.
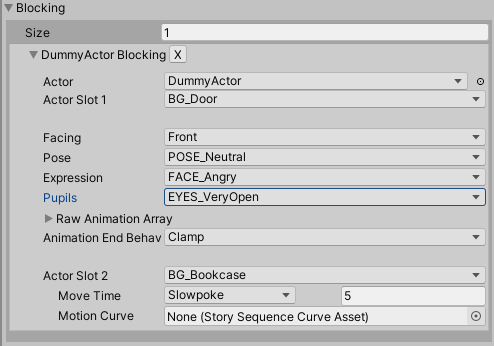
Within each Blocking you will find:
-
Actor: The Actor. Much like Sets the Actor property has two ways to set it. If you’ve used an Actor in this Sequence already it will appear as an option in the Dropdown to be selected quickly. Or if you need another Actor from the Project you can click the Object Picker Button to open an Object Picker and select an Actor from the Project.
-
Actor Skin: The Skin the actor is going to use.
-
Actor Slot 1: The Actor Slot in the Set the Actor should be placed at.
-
Facing: Which way the Actor is looking (this is a feature primarily for 2D Projects)
-
Animation Groups: If applicable, Animation Groups will appear here for selecting Animations particular to those Groups.
-
Pupil Offset: Allows to add an offset value to the pupils.
-
Raw Animation Array: An Array of the Animation names that should be played by the Actor during this Frame.
-
Animation End Behaviour: What the Actor should do when they finish playing their Animation. How this option is handled is based on the particular Actor Class involved.
-
Actor Slot 2: The Actor Slot to Tween this Actor TO. Much like Camera Animation, defining an End Slot will present additional properties to set. Note: This field may be hidden based on your Editor Config.
-
Move Time: The time, in seconds, it takes for this Actor to move from their Slot to their End Slot.
-
Motion Curve: The Story Sequence Curve Asset that will control the Ease of the Actor Motion.
-
Dialog
Dialog is what is being said and who is saying it, additionally the Text Style for how it should be presented and any customization particular to that Text Style.
Set Editing
Prefab Controls
At the top of the Set Editing display you will find two buttons:
-
Save: Saves changes to the current Set Prefab.
-
Close Set Editing: Closes the Set and returns the Tool Suite to Editing the prior Sequence at the Frame you left it at.
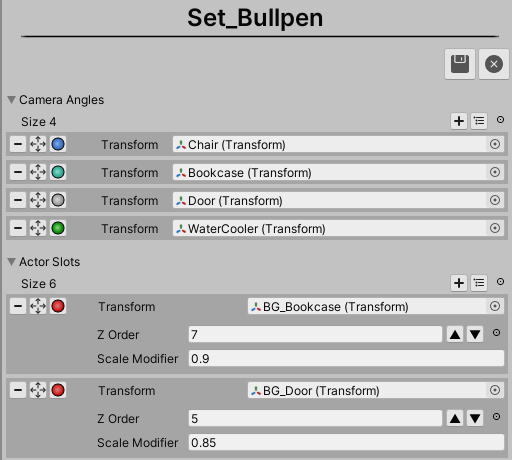
Camera Angles
Below the Prefab Controls is the Camera Angles Array. It is presented exactly the same as it is in the Set Inspector.
Actor Slots
Below the Camera Angles is the Actor Slots Array. It is presented exactly the same as it is in the Set Inspector.