CSV Schematics
CSV Schematics offers an alternative to traditional CSV Parsing. Normally you’d have to create a ClassMap for any Class you wanted to populate from a CSV which defined the CSV structure and how it ‘mapped’ to the corresponding Class’ properties. Now, you simply define the Cells needed (each Cell Type has its own Parsing logic) in a ScriptableObject which can be done by any of your Unity Developers familiar with the target class.
With Schematics we do this with ScriptableObjects which hold an array of Cells which map the PropertyPath for the incoming Data and custom code to Read and Write the CSV’s contents.
Creating and Editing Schematics
To Create a Schematic:
-
Navigate to the Project View
-
Click the Create ‘+’ Menu
-
Select Story Sequence > CSV Schematic
A new CSV Schematic ScriptableObject will be Created in your Project in the Folder currently selected.
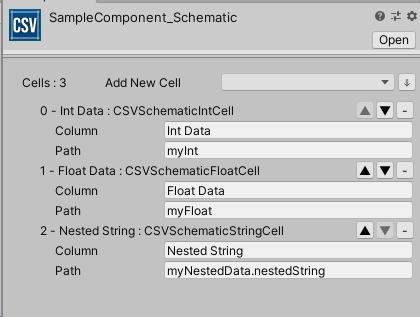
When Inspecting a CSV Schematic you can add Cells to the Schematic to define new Columns of Data in the corresponding CSV you will be Reading and Writing. The available Cell Types are scraped from the Assemblies defined in the Story Sequence Editor Config (and Project Settings). You can add new Cell Types to support specific Data content needs for your Project.
To Add a new Cell:
- Click the ‘Add New Cell’ Dropdown and select the desired Cell Type
OR
Click ‘↓’ Button to Copy Cells from ANOTHER Schematic
An Object Picker will Open…
Select the CSV Schematic who’s Cells you want to Copy onto the end of your Cells Array
Copying Cells is a great way to add many duplicate Columns of information that may repeat in your CSV structure (Story Sequence Blocking data is a good example of this as you can see in the StorySequence CSV Schematic included in the Project).
For each Cell you add you should define:
Column: This string can be used to reference a specific CSV Header name or simply as a reference depending on the Parser you construct.
Path: This string defines the SerializedProperty Path to use to get the SerializedProperty this Cell should Read/Write to/from.
Now your Schematic is ready to Parse.
Remember, because the Schematic is a ScriptableObject you can quickly duplicate it, and make alternates, or modify it and save it to change the structure of your CSVs without any engineering support (assuming the Cell Types you need and Parser exist).
Utilizing Schematics In order to Read or Write with your Schematic you will need to create a Parser class that inherits ICSVParser. There are two Parser examples included in the Project:
SampleComponentParser: Which handles very simple data and could be used as a guide or template for quickly getting your Import and Export needs rolling.
StorySequenceCSVParser: Which handles complicated StorySequences Data. This is a good example of a Parser that does a fair bit of heavy lifting, has to make some assumptions in order to map odd Data entry.
Extending Cell Types You can add new Cell Types for Schematics to make use of if you need to support additional Property Types or want to handle specific CSV Formatting and so on.
To do this you will need to create a new Class which inherits CSVSchematicCellBase, a ScriptableObject that also inherits the ICSVSchematicCell interface. There are a handful of useful examples of Cells in the Project already you can use to help you get started that range from very simple (CSVSchematicFloatCell) to still fairly straightforward (CSVSchematicObjectCell).
Note; your new Cell Types can be in any namespace you wish (if you want to keep them within your Project’s namespace, for example). Just make sure you add any necessary Assemblies to the StorySequenceEditorConfig so the Cells can be discovered when editing Schematics.