Changing the Manifest file
We will need to manually modify the manifest to allow Unity to be aware of the IdleKit packages within the Unity Package Manager.
This guide has two options for development setup. - Github Developer Setup - This option configures Unity to read the packages from Github directly - Local File Developer Setup - This option configures Unity to read the packages locally on disk
Github Development Setup
1. Modifying the Showcase Project's manifest file
We will be modifying the file Packages/manifest.json inside of idlekit-showcase to use the Unity Package Manager to find the repositories.
In the idlekit-showcase, locate the Packages folder, and open manifest.json
There are two ways of Unity accessing the projects: - Git Mode (for importing data or testing) - Local Developer Mode
2. Setting up Unity for Git Mode (Recommended)
For building or testing the project under normal development, Unity can access the repositories through the UPM.
Steps to complete: - Clone the idlekit-show project - Modify Packages/manifest.json - Configure gitbash and, if necessary, the bash script to start Unity
Clone the idlekit-showcase as you normally would for any project.
In the idlekit-showcase project, the Packages/manifest.json file will contain the IdleKit repository link (i.e: ssh://git[com](github/com)/Idlekit/idlekit-xxx.git).
Ensure the link point to your forked repo under the dependencies section.
Note
Your specific repository URLs may be different. They will be forked into your own GitHub space for access.
"dependencies": {
    ...
    "com.beamable": "{current beamable version}",
    "com.idlekit": "ssh://git[com](../../../github/com)/Idlekit/idlekit.git#{branchname}",
    ...
}
Note
{branchname} should be the branch you want to work on.
Note
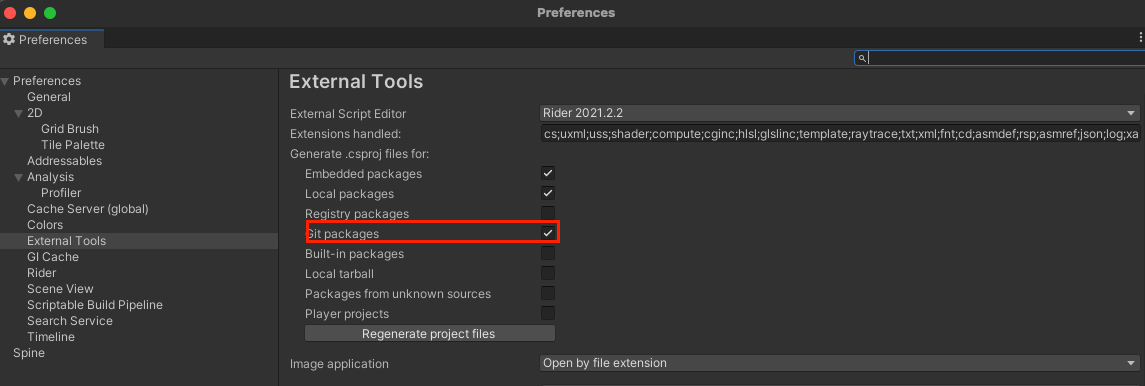
When using IdleKit as a git package if you can't see usages or can't see in-code documentation in the IdleKit code you need to enable the following option in Unity's Preferences:

After you've changed this setting, make sure to restart your Unity project to force the engine to generate the required .csproj files for IdleKit in your project folder. From then on you should be able to see usages and in-code documentation in IdleKit code.
Unity should be able to access your SSH keys and pull the private repo automatically, but if you get authentication errors when trying to load Unity, you can either try authenticating beforehand using the Git credentials helper, or if that also fails then you can use this bash script to ensure that your Git credentials are loaded correctly. Further reading is also available on the Unity website
Local File Development Setup
Important
It is not recommended to make any changes to the IdleKit repositories, as this will cause troubles during future releases. If you would like to make any changes, reach out to IdleKit support.
Use this setup if you are making any changes directly to the IdleKit package.
Steps to complete: - Review the suggested file structure - Clone the repository manually - Modify Packages/manifest.json
If you wish to use the local version of your repositories, you will need to git clone and git checkout the IdleKit repo under the correct branch. Ensure the IdleKit package is cloned somewhere outside of the project.
1. Suggested Local Package Installation Structure
You will need to git clone and git checkout the IdleKit repos.
The default branch is release-L.x.
2. Modifying the manifest.json file
Update the manifest.json file with these local package locations. These file locations replace the ssh entries. You will need to pull any changes in manually as the Unity Package Manager will be unaware of changes to the remote repositories.
-
Mac:
"dependencies": { "com.idlekit": "file:../../idlekit", ... } -
Windows:
"dependencies": {
    "com.idlekit": "file:C:\\[path_to_local_packages]\\idlekit",
    ...
}